 |
|
 Главная
- Анатомия ножа
- Ножны
- Мастерская
- Материалы
 Процесс изготовления
- Заточка
- Темляк
- Ковка
- Дамасская сталь
- Булат
- Мокуме Гане
- Ювелирное дело
- Травление
- Химия
- Ножевой бой
- Ножевые интернет ресурсы
- Онлайн магазины
- Чертежи
- Книги
- Делаем первый нож
- Национальные ножи
- История ХО
- Нож. Общая информация.
- Knifehelp благодарит
- Последние обновления

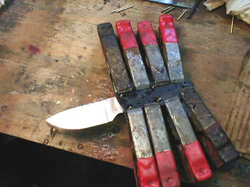
Изготовление скинера от Terry Hearn
Взято с knifenetwork.com
Now where do I start, just to many patterns to choose from. I think I'll make a little skinner!!
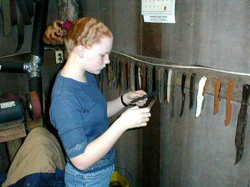
Well now that we somewhat have a pattern to work from, we can get started putting this knife together. I use 1/8" micarta for making my patterns, easy to grind. Generally if the shape feels good in your hand the knife will come out pretty good. My Daughter Ashley will be making this knife and I will be the picture taker...you notice I didn't say photographer either. We are going to start out with a pattern something like this before transfering it to steel. Y'all hang in there with us while I try to get this thing rollin'. That hole in the back is just fer hangin my patterns on a nail.
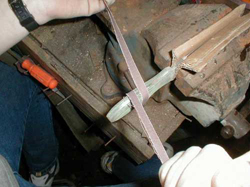
We're gonna start out with a 6 foot bar ff ATS-34 1/8" x 1-1/4". The template is clamped down on the bar and a scribeis used to get the outline. My scribe is a little wore out but its sharp.
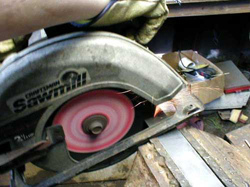
Ashley cutting off the bar with a skill saw using a metal cutting blade. I have been doing this for years and its a lot faster to me than a band saw, blades are cheaper too, and a whole lot less work than a hacksaw.
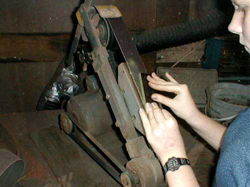
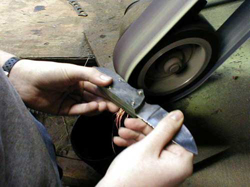
The next step is to profile out the blade. I use a 2" x 48" grinder with a 6" contact wheel. Starting out with a 80 grit belt, Ashley begins to shape out the profile of the knife. Notice that if you run the belt off to one side its easy to grind out those finger notches.
Well she finally got it profiled out. The next step is to get it good and flat. Just work it back and forth until its good and shiny, and flat too.
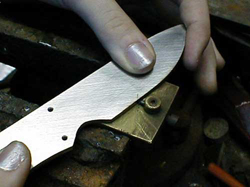
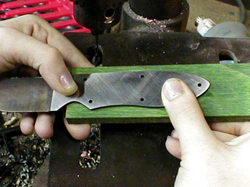
This next one shows the blade profiled out and ready to mark out where the holes will go for the pins. The finished blade isn't exactly like the pattern we started off with; she decided to change it up a little...its her knife.
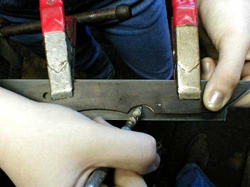
Ashley has decided to use five 3/32" brass pins to hold the handle on. She used a magic marker to draw out where the handle will come to and about where the pins will go. We center punch it with a punch made from an old broke round file. I have a lot of those and you cant beat em for a good punch.

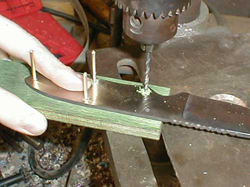
Next comes the drilling, just an old three speed craftsman drill press that has seen a lot of use.

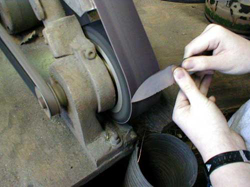
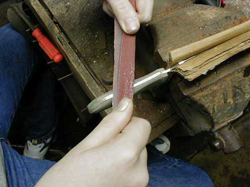
After the holes are drilled and counter sunk a little with a 1/4" drill bit, Ashley scribes a line on the edge with a scribe that was bought from Sheffields Knife Supply that is older than she is. I believe one of these runs about twelve dollars or so. A scribe line down the center helps keep your grind even on both sides.
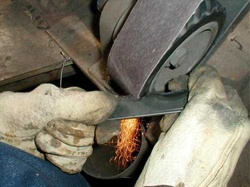
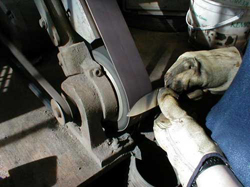
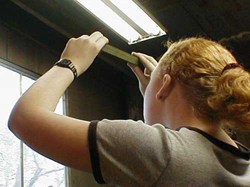
The next step is the hollow grinding. This is where I help her out a little, but not much, shes really getting good at it. Same old grinder, using an 80 grit belt. I'm teaching her to grind edge up, not like the ole man who learned to grind with the edge down, It just seems a little easier to learn like this. Go with whatever makes you feel comfortable...more than one way to grind a blade.
Now that the grind is finished, she decides to put a little filework on the back of the blade. First she used a magic marker to darken the blade up some. A triangle file is then used to lightly scribe a mark across the blade. Since the file has equal sides, after the first mark is scribed, just roll it over for the next one and so on until you have your pattern as far down the blade as you like.
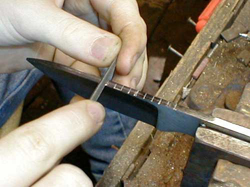
After laying it out , come back with a 1/8" round and file out every other mark as close to center of the blade as you can. Then go back using a triangle file to put a little notch between every one of the rounds that were just filed out. Sometimes a little does a lot for a blade.
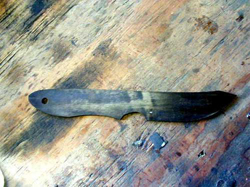
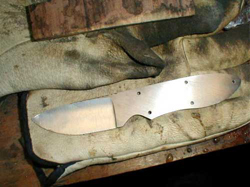
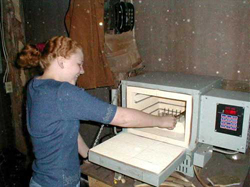
Lil Skinner, with all the holes drilled, ground and fileworked...ready for the oven.
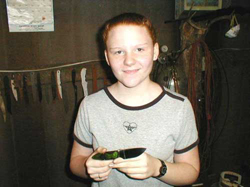
You see that smile, Ashley thinks shes finished for the day. Nope, just a little more to go.
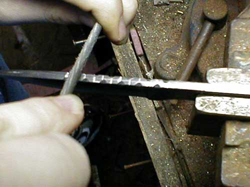
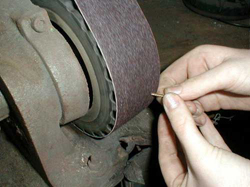
While the blade is in the oven I came up with a few more things for her to work on, cutting the pins. This is just a 3/32" brass brazing rod that you can get from any welding supply house.
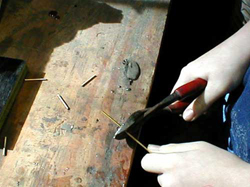
After cutting the pins turn, them down a little on the ends, this will help in starting them through the handle material.
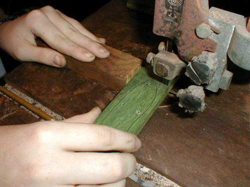
After picking out a handle material, in this case a camo pattern Dymondwood, she makes sure the scales are good and flat by sanding them down on the platen, without the motor running. Now with the blade out of the oven and on ice for the night I can take a little break too. Whew!!
Well another day and shes gonna try and finish this knife today. First thing we are going to do is pick up the scales and make sure they are good and flat. The best way I know is to put them together and put them up to the light to see if they are flat, if not sand a little more. I think she's happy so far. Don't want to see no daylight between 'em.
The next step is to position the scales for drilling. Make sure they run out a little further than what you want. You can always grind them down, but is sure hard to stretch 'em when they are too short.
Then we start to drill through one side of the knife through the handle material. Drill one hole then place a pin in it so it won't move, drill the next and then another pin, and so on until all holes are drilled. When you have one side drilled, flip the blade over and do the other side. While the pins are still in, trace around the profile of the tang for both the left and right scale.
Next, use a push stick to help cut off the excess handle material This will save a lot of time when we grind the handle down.
After Ashley cuts off the extra material, she places a couple of pins in the left scale, and then pushes them through just enough so they will line up with the holes in the tang. You can either do the right or left side first, either way will work. This will be ground off a little, place it back to the knife and see if the front of the handle is taking the shape you want.
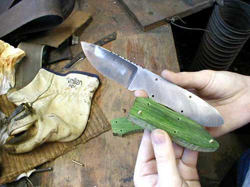
This is the way Ashley has decided that she wants the handle to look when viewing it from the left side.
Next pin the two sides together and grind down the right side so that it matches the left. Go ahead and finish it out to about a 400 grit.
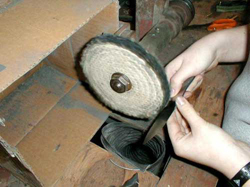
After you have the handles sanded down , go ahead and buff them out while they are still pinned together. I use a white 1200 grit rouge for this. Make sure you have them just like you want It is sure hard to go back and touch a spot up after its on the knife.
Now that the scales are ready to go on the knife, we are just going to lay them aside for now and go back and finish up the blade. Starting with a 220 grit belt and going on to a 400 grit for the final finish. It's gettin' there now.
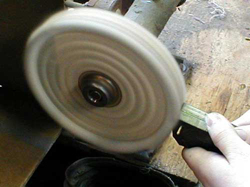
After she gets the blade exactly like she wants it , we then go to a sisal wheel loaded with black rouge. Lightly buff the blade to get all the 400 grit marks to blend. Too much pressure and you will have to go back to the grinder and start all over again. When you get it looking just like you want go to a floppy wheel with very little 1200 grit rouge on it. All we want to do in this step is to add a little shine to the finish we just worked so hard for. I meant Ashley, I'm the picture taker.
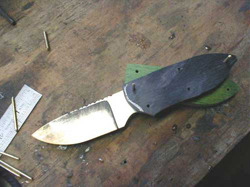
Now that the blade is finished all thats left to do is epoxy the handles on. She really likes this part the best. For this one we are going to use 30 minute epoxy. Mix it up real good and smear it all over the inside of the scales, mashing it down in the holes real good. Put a little on the ends of the pins and shove em in.
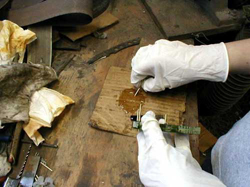
Clamp it up real good and just set it aside to wait for the epoxy to set up. This is the part about knifemaking I like best. It is also a good time to clean all the epoxy off the blade and where the front of the scales meet the blade. It is a lot easier now than after it has set up.
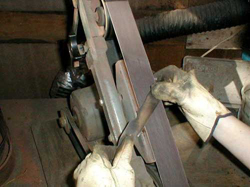
Epoxy all set up, now starting with a fresh 80 grit belt she begins to grind down the handle so it just touches the tang. I said a little, see those sparks!
Now that she has it pretty much shaped on the belt, the blade is wrapped in some card board to keep from scratching the finish. We tear small strips of shop roll starting with 80grit, 120, 220, and 400. Work it back and forth until all the corners are rounded and smooth.
After the handle is smooth, she goes all the way around the tang of the knife with a small piece of 120 grit shop roll with a file wrapped up in it. Work it back and forth across the tang, first one direction then the other. After you get all the sanding marks even go to 220, then 400 for the final finish.
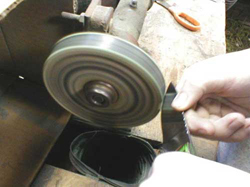
Now on to the buffer using green rouge, polish it up, down and all around.
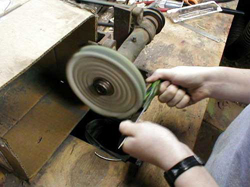
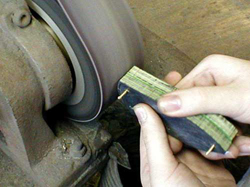
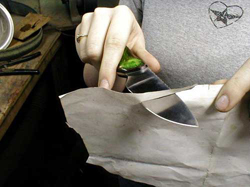
Next step is to put on that final edge, this is what Ashley's been waiting for all weekend. We ground the edge on the belt using a 220 grit until a burr appears all the way across the edge, then to a hard cotton buff loaded with green rouge.
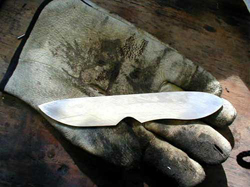
Yep she's happy now! Nothing like a good sharp knife...
That smile makes this all worth while! All that's left is to get her name on the blade tomorrow, and hopefully the sun will come out so I can get a good pic of the knife.